Chapter 3
AWS
Amazon Web Services
Amazon Web Services
This chapter will walk the reader through configuring a personal AWS account. Additional Pulumi and LocalStack installation instructions are included for managing cloud resources and local development respectively.
The following sections cover setting up an AWS account, creating AWS API credentials, and configuring the AWS CLI tool.
An AWS account is required to begin provisioning cloud resources. While the process is rather straightforward, instructions are provided below for additional guidance.
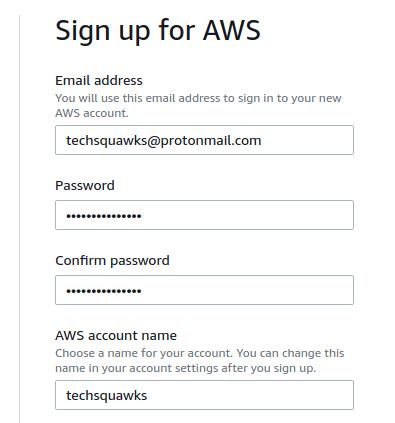
A credit card, email address, and phone number are required for setting up an AWS account. Readers who are students or US veterans may qualify for AWS Educate, which provides AWS credits for both courses and projects. More information can be found here.
Navigate to the AWS homepage and select the “Create an AWS Account” option in the page header.
Enter a preffered email address for the AWS account.
Complete the phone number verification process.
Afterwards, readers should recieve a confirmation email once the submitted account information is verified. This may take as long as two days.
Once verification is complete, verify that login is functioning for the root AWS account here using the credentials created in step #1.
After successfully setting up an account, AWS automatically creates a default user entity known as the root user, which has unlimited access to all cloud resources. Because of this, it is considered best practice to create a separate AWS user for development and rectrict access to the root user. The folowing instructions cover enabling MFA (multi-factor authentication) to secure access to the root user and creating a separate developer user with programtic credentials for the AWS CLI and SDK.
Log into the AWS console. Type “IAM” into the top search bar and click on the first result from the dropdown.
On the IAM dashboard, select the option to configure MFA on the root account.
Select “Virtual MFA Device” for the MFA type.
Scan the resulting QR code and enter the two resulting codes.
It may be beneficial to save a screenshot of the QR code image. In the event that readers lose their MFA device, MFA can then be easily reconfigured on a separate device.
Within the IAM menu, go to the users tab and press the “Add Users”
Select both “Programatic access” and “AWS Management Console access” options. Enter an AWS console password and unselect “Require password reset”
Under “Attach existing policies directly”, check “Aministrator Access”.
Skip the tags section and click Create User
After the user is generated, click “Download .csv” to download the access and secret key pair and a user-specific sign-in URL.
Credentials are only available for download immediately after generation. Afterwards, the credentials will be unrecoverable.
AWS provides a CLI tool for facilitating the invocation of cloud APIs, leveraging a user’s local credentials.
The following instructions target version 2 of the AWS CLI. For version 1, see these instructions. Note that these versions are not backwards compatible.
Download and install the CLI for the desired operating system:
Download and run the CLI installer.
Download the latest pkg file here and double-click to install.
Execute the following:
$ curl "https://awscli.amazonaws.com/AWSCLIV2.pkg" -o "AWSCLIV2.pkg"
$ sudo installer -pkg AWSCLIV2.pkg -target /
For x86 (64-bit) distributions:
$ curl "https://awscli.amazonaws.com/awscli-exe-linux-x86_64.zip" -o "awscliv2.zip"
$ unzip awscliv2.zip
$ sudo ./aws/install
For ARM distributions, execute the following:
$ curl "https://awscli.amazonaws.com/awscli-exe-linux-aarch64.zip" -o "awscliv2.zip"
$ unzip awscliv2.zip
$ sudo ./aws/install
Run the following too confirm that the CLI has been successfully installed:
Command
aws --version
Output
aws-cli/2.5.8 Python/3.9.11 Windows/10 exe/AMD64 prompt/off
Run the following and enter the credentials downloaded from the previous section when prompted. This will enable the CLI to authenitcate with AWS services.
Command
aws configure
Interactive Prompt
AWS Access Key ID [None]: access-key-value-here
AWS Secret Access Key [None]: secret-key-value-here
Default region name [None]: us-east-1
Default output format [None]:
Run the following to ensure the CLI is properly configured, which will return the active user and account information.
Command
aws sts get-caller-identity
Output
{
    "UserId": "BIDAYGZ7AN44NDI6LOIG4",
    "Account": "012345678910",
    "Arn": "arn:aws:iam::012345678910:user/username"
}
When working in cloud environments, it is useful to be able to define and statefully manage infrastructure. Pulumi is an Infrastructure as Code (IAC) utility that allows developers to programatically create, update, and delete cloud resources using programming languages such as Typescript, Javascript, Python, and Go.
Download and install Pulumi following the instructions here.
Confirm the CLI is successfully installed by running the following.
Command
pulumi version
Example Output
v3.39.1
Within an empty directory, execute one of the following to create a Pulumi project for the target programming language.
pulumi new aws-typescript
pulumi new aws-javascript
pulumi new aws-python
pulumi new aws-go
Once the Pulumi project has initialized, run the following command to ensure Pulumi is able to execute the project for the target language.
The pulumi preview command will list which cloud resources will be generated by the Pulumi program. For a default Pulumi project, there should only be the default S3 bucket for data storage.
Command
pulumi preview
Example Output
Previewing update (dev)

View Live: https://app.pulumi.com/username/test/dev/previews/5aa60450-112f-4394-99c7-233c13822001

     Type                 Name       Plan
 +   pulumi:pulumi:Stack  test-dev   create
 +   └─ aws:s3:Bucket     my-bucket  create

Outputs:
    bucketName: output<string>

Resources:
    + 2 to create
To verify deployments are working as expected, execute the following:
Command
pulumi up -f
Example Output
Updating (dev)

View Live: https://app.pulumi.com/username/test/dev/updates/1

     Type                 Name       Status
 +   pulumi:pulumi:Stack  test-dev   created
 +   └─ aws:s3:Bucket     my-bucket  created

Outputs:
    bucketName: "my-bucket-9f5953e"

Resources:
    + 2 created

Duration: 6s
Once the above runs successfully, run the following to delete any provisioned resources.
Command
pulumi down -f
Example Output
Destroying (dev)

View Live: https://app.pulumi.com/username/test/dev/updates/2

     Type                 Name       Status
 -   pulumi:pulumi:Stack  test-dev   deleted
 -   └─ aws:s3:Bucket     my-bucket  deleted

Outputs:
  - bucketName: "my-bucket-fb2b85f"

Resources:
    - 2 deleted

Duration: 4s
While it is preferrable to develop and test applications against actual cloud resources when possible, not all readers may have AWS access or be able to set up a private account. Additionally, there is always the risk of leaving cloud resources provisioned, which may result in unintended charges. To make these tutorials as accessible and cost-effective as possible, examples in these tutorials leverage the free-tier version of LocalStack whenever possible.
LocalStack is able to emulate an AWS cloud environment on the user’s development machine, making it useful for both development and testing. Examples that work and function with the free-tier version of LocalStack will be appropriately marked.
LocalStack requires the following be installed on the user’s local machine to function properly.
Navigate to the Python and Docker Desktop installation page for platform-specific setup instruction.
LocalStack offers a CLI for provisioning an AWS test environment. To install it, execute the following.
pip3 install localstack
Initialize Localstack with the following:
localstack start
Adding the --endpoint-url option to the AWS CLI will direct API requests to the Localstack instance. For example, the following will create an AWS S3 data storage bucket within Localstack.
aws --endpoint-url=http://localhost:4566 s3 mb s3://mytestbucket
This section will cover general AWS terms and concepts, in addition to a brief overview of AWS cloud service categories and offerings.
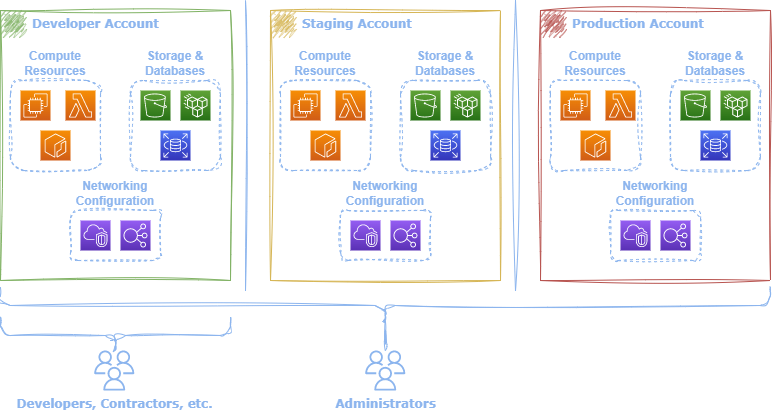
After initially signing up for AWS, a default root account is created. AWS accounts function as containers for organizing and isolating cloud resources. For example, deployment environments, such as development, staging, and production, often utilize distinct AWS accounts. In addition, accounts act as a security boundary, ensuring only authorized users and systems can access particular cloud resources. 1
An AWS account has the following unique identifiers:2
The active account ID can be fetched from the Security Token Service (STS) with the following CLI command:
Command
aws sts get-caller-identity --query Account --output text
Output
123456789012
The command aws sts get-caller-identity fetches the active user information leveraged by the CLI, which includes the user ID, the account ID, and the user access resource number (ARN). The --query flag enables users to target a particular field to output in the response and --output specifies the desired format (yaml, josn, text, etc.) 3 4
The simplest way to fetch the canonical ID is via the Simple Storage Service (S3) API CLI command.
Command
aws s3api list-buckets --query Owner.ID --output text
Output
79a59df900b949e55d96a1e698fbacedfd6e09d98eacf8f8d5218e7cd47ef2be
https://docs.aws.amazon.com/accounts/latest/reference/accounts-welcome.html ↩︎
https://docs.aws.amazon.com/general/latest/gr/acct-identifiers.html ↩︎
https://docs.aws.amazon.com/cli/latest/userguide/cli-usage-filter.html ↩︎
https://docs.aws.amazon.com/cli/latest/userguide/cli-usage-output-format.html ↩︎
Account aliases are public-facing, globally unique labels to simplify the console sign-in URL.
https://<account_alias>.signin.aws.amazon.com/console/
While the original sign-in URL https://<account_id>.signin.aws.amazon.com/console/ remains active, the account alias may provide a more user-friendly identifier. A single account may have multiple account aliases associated with it.
Account aliases are managed through the Identity and Access Management (IAM) service and may be provisioned, listed, and deleted using the AWS CLI.
Example 1: Creating an Account Alias
Command
aws iam create-account-alias --account-alias techsquawks
Example 2: Listing Account Aliases
Command
aws iam list-account-aliases
Output
{
    "AccountAliases": [
        "techsquawks"
    ]
}
Example 3: Deleting an Account Alias
Command
aws iam delete-account-alias --account-alias techsquawks
Accounts may optionally be associated with a single password policy which dictates the minimum password complexity for account users, to avoid potentially weak password. Password policies consist of the following components1:
! @ # $ % ^ & * ( ) _ + - = [ ] { } | ' (Default value: false)Example 1: Creating/Updating Password Policy
See here for additional CLI arguments. Fields not specified in the arguments are set to their default values.
Command
aws iam update-account-password-policy
Example 2: Fetch Account Password Policy
Command
aws iam get-account-password-policy
Output
{
    "PasswordPolicy": {
        "MinimumPasswordLength": 6,
        "RequireSymbols": false,
        "RequireNumbers": false,
        "RequireUppercaseCharacters": false,
        "RequireLowercaseCharacters": false,
        "AllowUsersToChangePassword": false,
        "ExpirePasswords": false
    }
}
Example 3: Deleting Account Password Policy
Command
aws iam delete-account-password-policy
An AWS region is a geographic area that contains interconnected AWS data centers used for provisioning cloud resources. Available regions can be listed with the following CLI command:
Command
aws ec2 describe-regions --all-regions --query Regions[*].RegionName
Output
[
    "af-south-1",
    "eu-north-1",
    "ap-south-1",
    ...
]
Regions are isolated from one another for additional fault tolerance and stability.1 AWS cloud service offerings may differ between regions. Therefore, cloud engineers should verify that any required cloud services are available in the desired regions before beginning development.
An availabiilty zone (commonly abreviated as AZ) is one or more discrete AWS data centers that have redundant connectivity, networking, and power within a given AWS region. AZs are interconnected through low-latency networking and data replication. It is considered best practice to deploy cloud applications across multiple AZs for increased fault tolerance, in the event that one or more AZs experience technical outages.2

AZ names are of the following format \<region-name\>\<letter[a-z]\>. For example:.
Command
aws ec2 describe-availability-zones --query AvailabilityZones[*].ZoneName --region us-east-2
Output
[
    "us-east-2a",
    "us-east-2b",
    "us-east-2c"
]
A resource is a broad term for any cloud entity that can be provisioned in AWS. For instance, servers, virtual private networks, networking policies, and account users are considered AWS resources. Every resource is associated with an Amazon Resource Number (ARN), which uniquely identifies it. ARNs have the following format1:
arn:aws:[service]:[region]:[account-id]:[resource-id]
arn:aws:[service]:[region]:[account-id]:[resource-type]:[resource-id]
arn:aws:[service]:[region]:[account-id]:[resource-type]/[resource-id]
A breakdown of the above fields is provided below:
Certain resources may omit either or both the region, account-id from the ARN.
For instance, the following fetches the ARN of the active AWS user associated with the local developers AWS credentials.
Command
aws sts get-caller-identity --query Arn --output text --region us-east1
Output
arn:aws:iam::012345678910:user/username
For the above output, iam refers to the AWS Identity Access Management service. This is followed by the account number which owns
the user entity and the IAM resource is of type user.
Tags are user-defined metadata that can be attached to resources. This can be used to distinguish and group resources.
For instance, to add a tag to your active user.
Command
export USERNAME=$(aws iam get-user --query  User.UserName)
aws iam tag-user --user-name $USERNAME --tags '{"Tag": "You are it!"}'
aws iam list-user-tags --user-name $USERNAME
Output
{
    "Tags": [
        {
            "Tag": "You are it!"
        }
    ]
}
AWS cloud resources are available through services, APIs accessible through the AWS console or programtically. As an introduction, common service categories and offerings are briefly explored here.1 2
Service offerings and pricing may differ between regions. This should be taken into account when designing cloud applications. A complete listing of AWS services by region is available here
Compute services enable users to run and host programs and applications.
| Name | Logo | Description |
|---|---|---|
| EC2 | Elastic Cloud Compute: Provisioning and managing of virtual and private physical servers | |
| ECS | Elastic Container Service: Executing containerized applications on custom infrastructure | |
| EKS | Elastic Kubernetes Service: Managed Kubernetes clusters | |
| Lambda | Code execution in ephemeral environments without need for provisioning/managing underlying infrastructure |
AWS offers various data storage services of the following types:
| Name | Logo | Description |
|---|---|---|
| S3 | Simple Storage Service. Object storage where data can be uploaded to uniquely named data buckets under a unique key | |
| EBS | Elastic Block Storage. Provides SSD and HDD block storage for EC2 servers | |
| EFS | Elastic File Storage. Serverless remote storage via the NFSv4 protocol |
While databases can be configured by leveraging both compute and storage services, AWS offers database services to facilitate proviioning, managing, and monitoring such systems. These offerings include the following database types:
| Name | Logo | Description |
|---|---|---|
| Elasticache | Managed Redis and Memcached in-memory databases | |
| RDS | Relational Database Service: For provisioning relational database systems (MySQL, Postgres, etc.) | |
| DynamoDB | Key-value NoSQL database | |
| DocumentDB | MongoDB-esque NoSQL database | |
| Timestream | Enables querying for data within a certain date range. |
While listed under the analytics category, AWS offers Redshift, a Postgres-esque columnar database, for querying larger datasets. It is intended as a data warehousing solution rather than a general-use database.
Networking & Content Delivery services allow cloud developers to define virtual networks, firewall rules, and CDNs to improve latency.
| Name | Logo | Description |
|---|---|---|
| VPC | Define virtual private networks within a given IP range | |
| Cloudfront | Managed CDN network for content delivery in different regions of the globe | |
| Route53 | Amazon’s DNS service |
Security, Identity, & Compliance services assist with securing and auditing access to both AWS account resources and cloud applications.
| Name | Logo | Description |
|---|---|---|
| IAM | Ensures authorized access to AWS cloud resources | |
| Cognito | Provides identity and login managmenet for cloud applications | |
| Secret Manager | Manages storage and access of private application values (i.e. database credentials, private application keys, etc.) |
Management and Governance services are responsible for providing visibility into finacial, application, and user activity in the AWS cloud.
| Name | Logo | Description |
|---|---|---|
| Cloudwatch | Application and service logging | |
| Cloudtrail | Audit trail of cloud account activities |
This section covers manually generating and signing HTTP requests sent to AWS services. While it is ideal for developers to offload this process to the AWS SDKs, AWS CLI, or IaC tooling (i.e. Pulumi), such knowledge can be invaluable when troubleshooting errors and provide a grounded understanding of how AWS API requests are processed.
AWS cloud services are available through public API endpoints. Whether invoked via the AWS CLI, SDKs, or Infrastructure as Code (IaC) tools, each approach ultimately results in sending HTTP requests to AWS service endpoints. These underlying HTTP requests are referred to as canonical requests.
AWS canonical requests include a signature generated with request parameters and AWS secret key. This signature enables AWS to validate the identity of the client, protect the API request data in transit, and mitigate potential relay attacks.
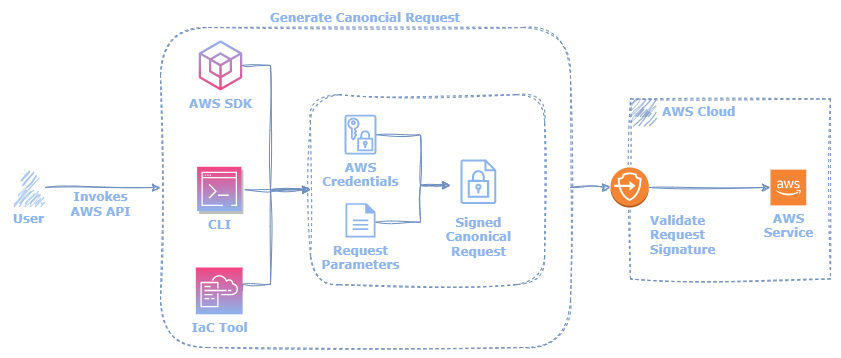
While developers may directly create, sign, and transmit canonical requests to AWS, it is often preferable to utilize the AWS-provided CLI and SDKs. Direct canonical calls to AWS are primarily recommended in cases when developing in unsupported programming languages or where fine-grained API control is required.
Canonical requests are composed of the following component:1
CanonicalRequest =
    HTTPRequestMethod + '\n' +
    CanonicalURI + '\n' +
    CanonicalQueryString + '\n' +
    CanonicalHeaders + '\n' +
    SignedHeaders + '\n' +
    HexEncode(Hash(RequestPayload))
The individual components are defined below:
All canonical requests include a hash value generated from the API parameters and account credentials. When AWS receives an API request, it generates the same hash from the provided API parameters and compares it to the original request to validate the identity of the caller. If the request hash and the AWS-generated hash do not match, the request is denied. The process of generating this request hash is known as signing.1
There are two versions of AWS signing, version 4 and version 2, with version 2 being deprecated at the time of writing. As such, only version 4 is explored here.
The version 4 signing process consists of the following steps and components2:
Creating the credential scope: This value restricts the request to the target service and region and is of the following format: TIMESTAMP/REGION/SERVICE/SIGNING_VERSION where the timestamp value is of form YYYYMMDD.
Generate the target string to sign: This consists of the signing algorithm used to produce the signature (AWS4-HMAC-SHA256), the Amzaon-formatted request timestamp (i.e. YYYYMMDDHHMMSSZ), the previously produced credential scope, and a hash of the canonical requests string, all separated by newline characters:
signatureString = SIGNING_ALGORITHM + "\n" +
AMAZON_DATE_TIMESTAMP + "\n" +
CREDENTIAL_SCOPE + "\n" +
SHA256(CANONICAL_REQUEST_STRING)
Create the signature key: The signature key, used to sign the request string, is derived from the AWS secret key, Amazon-formatted request timestamp, region, and service. The following Pseudocode illustrates this process:
kDate = hash("AWS4" + Key, Date)
kRegion = hash(kDate, Region)
kService = hash(kRegion, Service)
signatureKey = hash(kService, "aws4_request")
Sign the previously generated signature string with the signature key and encode the hexadecimal representation.
signature = hexEncode(hash(signatureKey, signatureString))
Below provides a concrete example for generating a version 4 signature from an arbitrary string:
ts-node signing.ts $AWS_SECRET_KEY us-west-1 ssm "Hello World!"
// can_req/ts/signing.ts

import * as crypto from "crypto";

const SIGNING_ALGORITHM = "AWS4-HMAC-SHA256";

export function getTimestamps(): [string, string] {
  const now = new Date();
  const year = now.getUTCFullYear();
  const month = String(now.getUTCMonth() + 1).padStart(2, "0");
  const day = String(now.getUTCDate()).padStart(2, "0");
  const hours = String(now.getUTCHours()).padStart(2, "0");
  const minutes = String(now.getUTCMinutes()).padStart(2, "0");
  const seconds = String(now.getUTCSeconds()).padStart(2, "0");

  const amzTimestamp = `${year}${month}${day}T${hours}${minutes}${seconds}Z`;
  const reqTimestamp = `${year}${month}${day}`;
  return [amzTimestamp, reqTimestamp];
}

export function getCredentialScope(
  reqTimestamp: string,
  region: string,
  service: string
): string {
  return `${reqTimestamp}/${region}/${service}/aws4_request`;
}

export function getStringToSign(
  amzTimestamp: string,
  scope: string,
  message: string
): string {
  return [
    SIGNING_ALGORITHM,
    amzTimestamp,
    scope,
    computeSHA256SignatureHash(message),
  ].join("\n");
}

export function sign(key: Buffer, message: Buffer): Buffer {
  return crypto.createHmac("SHA256", key).update(message).digest();
}

export function signHex(key: Buffer, message: Buffer): string {
  return crypto.createHmac("SHA256", key).update(message).digest("hex");
}

export function computeSHA256SignatureHash(input: string): string {
  return crypto.createHash("SHA256").update(input).digest("hex");
}

export function getAWS4SignatureKey(
  key: string,
  reqTimestamp: string,
  region: string,
  service: string
): Buffer {
  const kDate = sign(Buffer.from("AWS4" + key), Buffer.from(reqTimestamp));
  const kRegion = sign(kDate, Buffer.from(region));
  const kService = sign(kRegion, Buffer.from(service));
  const kSigning = sign(kService, Buffer.from("aws4_request"));
  return kSigning;
}

if (require.main === module) {
  // Get user input
  const secretKey = process.argv[2];
  const region = process.argv[3];
  const service = process.argv[4];
  const userInput = process.argv[5];

  // Get the required timestamp strings
  let [amzTimestamp, reqTimestamp] = getTimestamps();
  console.log("Amazon Timestamp: " + amzTimestamp);
  console.log("Requset Timestamp: " + reqTimestamp);

  // Get the scope of the request (the timestamp and the target service)
  const scope = getCredentialScope(reqTimestamp, region, service);
  console.log("Credential Scope: " + scope);

  //  Get the AWS v4 signing key
  const key = getAWS4SignatureKey(secretKey, reqTimestamp, region, service);
  console.log("Signing Key: " + key.toString("hex"));

  // Prepare string value to sign from user input
  const stringToSign = getStringToSign(amzTimestamp, scope, userInput);
  console.log("String to sign: " + JSON.stringify(stringToSign));

  // Sign and output user string
  const signature = signHex(key, Buffer.from(stringToSign));
  console.log("Signed String: " + signature);
}
node signing.js $AWS_SECRET_KEY us-west-1 ssm "Hello World!"
// can_req/js/signing.js

var crypto = require("crypto");

const SIGNING_ALGORITHM = "AWS4-HMAC-SHA256";

function getTimestamps() {
  const now = new Date();
  const year = now.getUTCFullYear();
  const month = String(now.getUTCMonth() + 1).padStart(2, "0");
  const day = String(now.getUTCDate()).padStart(2, "0");
  const hours = String(now.getUTCHours()).padStart(2, "0");
  const minutes = String(now.getUTCMinutes()).padStart(2, "0");
  const seconds = String(now.getUTCSeconds()).padStart(2, "0");

  const amzTimestamp = `${year}${month}${day}T${hours}${minutes}${seconds}Z`;
  const reqTimestamp = `${year}${month}${day}`;
  return [amzTimestamp, reqTimestamp];
}

function getCredentialScope(reqTimestamp, region, service) {
  return `${reqTimestamp}/${region}/${service}/aws4_request`;
}

function getStringToSign(amzTimestamp, scope, message) {
  return [
    SIGNING_ALGORITHM,
    amzTimestamp,
    scope,
    computeSHA256SignatureHash(message),
  ].join("\n");
}

function sign(key, msg) {
  return crypto
    .createHmac("SHA256", key)
    .update(Buffer.from(msg, "utf-8"))
    .digest();
}

function signHex(key, msg) {
  return crypto.createHmac("SHA256", key).update(msg).digest("hex");
}

function computeSHA256SignatureHash(input) {
  return crypto
    .createHash("SHA256")
    .update(Buffer.from(input, "utf-8"))
    .digest("hex");
}

function getAWS4SignatureKey(key, reqTimestamp, region, service) {
  const kDate = sign(Buffer.from("AWS4" + key, "utf-8"), reqTimestamp);
  const kRegion = sign(kDate, region);
  const kService = sign(kRegion, service);
  const kSigning = sign(kService, "aws4_request");
  return kSigning;
}

if (require.main === module) {
  // Get user input
  const secretKey = process.argv[2];
  const region = process.argv[3];
  const service = process.argv[4];
  const userInput = process.argv[5];

  // Get the required timestamp strings
  [amzTimestamp, reqTimestamp] = getTimestamps();
  console.log("Amazon Timestamp: " + amzTimestamp);
  console.log("Request Timestamp: " + reqTimestamp);

  // Get the scope of the request (the timestamp and the target service)
  const scope = getCredentialScope(reqTimestamp, region, service);
  console.log("Credential Scope: " + scope);

  //  Get the AWS v4 signing key
  const key = getAWS4SignatureKey(secretKey, reqTimestamp, region, service);
  console.log("Signing Key: " + key.toString("hex"));

  // Prepare string value to sign from user input
  const stringToSign = getStringToSign(amzTimestamp, scope, userInput);
  console.log("String to sign: " + JSON.stringify(stringToSign));

  // Sign and output user string
  const signature = signHex(key, stringToSign);
  console.log("Signed String: " + signature);
}

module.exports = {
  getTimestamps,
  getCredentialScope,
  computeSHA256SignatureHash,
  getAWS4SignatureKey,
  getStringToSign,
  signHex,
};
python3 signing.py $AWS_SECRET_KEY us-west-1 ssm "Hello World!"
# can_req/py/signing.py

import base64, datetime, hashlib, hmac, json, sys

SIGNING_ALGORITHM = "AWS4-HMAC-SHA256"


def get_timestamps() -> tuple[str, str]:
    """Get strings of required timestamps for canonical requests"""
    now = datetime.datetime.utcnow()
    amazon_timestamp = now.strftime("%Y%m%dT%H%M%SZ")
    req_timestamp = now.strftime("%Y%m%d")
    return amazon_timestamp, req_timestamp


def get_credential_scope(req_timestamp: str, region: str, service: str) -> str:
    """Define the scope of the request, which includes the target region and service"""
    return "{}/{}/{}/aws4_request".format(req_timestamp, region, service)


def sign(key: str, msg: str) -> bytes:
    """Generate the HMAC-SHA256 hash of a target string using the provided secret key"""
    return hmac.new(key, msg.encode("utf-8"), hashlib.sha256).digest()


def compute_sha256_hash(input: str) -> str:
    """Create SHA256 hash of a target string"""
    m = hashlib.sha256()
    m.update(input.encode("utf-8"))
    result = m.hexdigest()
    return result


def get_string_to_sign(amzn_date_stamp: str, scope: str, can_req: str) -> str:
    """Get string to sign from request parameters"""
    return "\n".join(
        [SIGNING_ALGORITHM, amzn_date_stamp, scope, compute_sha256_hash(can_req)]
    )


def get_aws4_signature_key(
    key: str, datestamp: str, region: str, service_name: str
) -> bytes:
    """Generature canonical requests signature"""
    kdate = sign(("AWS4" + key).encode("utf-8"), datestamp)
    kregion = sign(kdate, region)
    kservice = sign(kregion, service_name)
    ksigning = sign(kservice, "aws4_request")
    return ksigning


if __name__ == "__main__":
    # Get user input from command args
    amazon_secret_key = sys.argv[1]
    region = sys.argv[2]
    service = sys.argv[3]
    user_input = sys.argv[4]

    # Fetch the required timestamps
    amazon_timestamp, req_timestamp = get_timestamps()
    print("Amazon Timestamp: " + amazon_timestamp)
    print("Request Timestamp: " + req_timestamp)

    # The scope/action permitted by the signed credentials
    credential_scope = get_credential_scope(req_timestamp, region, service)
    print("Credential Scope: " + credential_scope)

    # Generate and print signed string
    signature_key = get_aws4_signature_key(
        amazon_secret_key, req_timestamp, region, service
    )
    print("Signing Key: " + base64.b64encode(signature_key).decode())
    string_to_sign = get_string_to_sign(amazon_timestamp, credential_scope, user_input)
    print("String to sign: " + json.dumps(string_to_sign))
    signature = hmac.new(
        signature_key, string_to_sign.encode("utf-8"), hashlib.sha256
    ).hexdigest()
    print("Signed String: " + signature)
go run signing_driver.go signing.go $AWS_SECRET_KEY us-west-1 ssm "Hello World!"
// can_req/go/signing.go

ackage main

import (
	hmac "crypto/hmac"
	"crypto/sha256"
	"encoding/json"
	"fmt"
	"os"
	"strings"
	"time"
)

const SIGNING_ALGORITHM = "AWS4-HMAC-SHA256"

func getTimestamps() (string, string) {
	now := time.Now().UTC()
	return now.Format("20060102T150405Z"), now.Format("20060102")
}

func getCredentialScope(request_timestamp string, region string, service string) string {
	return fmt.Sprintf("%s/%s/%s/aws4_request", request_timestamp, region, service)
}

func sign(key string, message string) string {
	mac := hmac.New(sha256.New, []byte(key))
	mac.Write([]byte(message))
	return string(mac.Sum(nil))
}

func signHex(key string, message string) string {
	mac := hmac.New(sha256.New, []byte(key))
	mac.Write([]byte(message))
	return fmt.Sprintf("%x", string(mac.Sum(nil)))
}

func computeSHA256Hash(input string) string {
	hash := sha256.New()
	hash.Write([]byte(input))
	return fmt.Sprintf("%x", string(hash.Sum(nil)))
}

func getStringToSign(amazon_timestamp string, scope string, can_req string) string {
	components := [...]string{SIGNING_ALGORITHM, amazon_timestamp, scope, computeSHA256Hash(can_req)}
	return strings.Join(components[:], "\n")
}

func getAWS4SignatureKey(secret_key string, request_timestamp string, region string, service string) string {
	kdate := sign("AWS4"+secret_key, request_timestamp)
	kregion := sign(kdate, region)
	kservice := sign(kregion, service)
	ksigning := sign(kservice, "aws4_request")
	return ksigning
}

func runDemo() {
	// Get user input from command args
	amazon_secret_key := os.Args[1]
	region := os.Args[2]
	service := os.Args[3]
	user_input := os.Args[4]

	// Fetch the required timestamps
	amazon_timestamp, request_timestamp := getTimestamps()
	fmt.Printf("Amazon Timestamp: %s\n", amazon_timestamp)
	fmt.Printf("Request Timestamp: %s\n", request_timestamp)

	// Get the scope/permitted API action for the signed credentials
	credential_scope := getCredentialScope(request_timestamp, region, service)
	fmt.Printf("Credential Scope: %s\n", credential_scope)

	// Generate and print signed string
	signature_key := getAWS4SignatureKey(amazon_secret_key, request_timestamp, region, service)
	fmt.Printf("Signing Key: %x\n", signature_key)
	string_to_sign := getStringToSign(amazon_timestamp, credential_scope, user_input)
	string_to_sign_formatted, _ := json.Marshal(string_to_sign)
	fmt.Printf("String to sign: `%s`\n", string_to_sign_formatted)
	signature := signHex(signature_key, string_to_sign)
	fmt.Printf("Signed String: " + signature)
}
// can_req/go/signing_driver.go

package main

func main() {
	runDemo()
}
Output
Amazon Timestamp: 20230625T174754Z
Requset Timestamp: 20230625
Credential Scope: 20230625/us-west-1/ssm/aws4_request
Signing Key: 843b458b4664ec9c54e42274a490b2c7cb2802cc104dcba2ad2df8fe71c008ff
String to sign: "AWS4-HMAC-SHA256\n20230625T174754Z\n20230625/us-west-1/ssm/aws4_request\n7f83b1657ff1fc53b92dc18148a1d65dfc2d4b1fa3d677284addd200126d9069"
Signed String: cc1a8368f317707c89b33e8f627f722819ed4d28341fef7b56720103b5d3fe79
The below steps provide a broad overview for how to successfully perform a canonical request to AWS services.
Procure AWS credentials, an access key ID and a secret key value, for generating the canonical request. The access key ID will indicate the identity of the caller and the secret value will be used to generate the request signature.
Creating the credential scope: This value restricts the request to the target service and region and is of the following format: TIMESTAMP/REGION/SERVICE/SIGNING_VERSION where the timestamp value is of form YYYYMMDD.
Generate a SHA256 hash of the parameters included in the request body.
payloadHash = SHA256(CANONICAL_REQUEST_STRING)
Generate a string containing a list of request headers, with each key/value pair separated by newline characters. Ensure that the headers are listed alphabetically and that the resulting string is also newline terminated.
canonicalHeadersString = ""
headers.sort()
for headerName, headerValue in headers:
  canonicalHeadersString += headerName + ":" + headerValue + "\n"
Generate a string containing all the canonical request information, including the HTTP method, request URI, query parameters, the previously generated header string, alphabetically listed headers used in signing process, and the previously generated request payload hash separated by newline characters.
canonicalRequest = httpMethod + "\n" +
  requestUri + "\m" +
  queryString + "\n" +
  canonicalHeadersString + "\m"  +
  SIGNED_HEADERS + "\m" +
  payloadHash
Following the steps outline in the previous section, generate the request signature.
Generate the authorization header from the following components.
authorizationHeader = `${SIGNING_ALGORITHM} Credential=${amazonKeyId}/${scope}, SignedHeaders=${SIGNED_HEADERS}, Signature=${signature}`;
Perform an HTTP request with the canonical request parameters.
http_request(endpoint=URI + QUERY_PARAMATERS, headers={header_1=value_1, header_2=value_2, ..., header_n=value_n, Authorization=authorizationHeader}, data=apiParameters, method=httpMethod)
The following are concrete code examples demonstrating how to generate and send a canonical request to list the AWS account users. For those interested, the AWS SDKs can provide further concrete examples for handling canonical requests in a more general manner.
ts-node request.ts $AWS_ACCESS_KEY_ID $AWS_SECRET_KEY
// can_req/ts/request.ts

import * as signing from "./signing";
import * as https from "https";

const METHOD = "GET";
const SIGNING_ALGORITHM = "AWS4-HMAC-SHA256";
const CONTENT_TYPE = "application/x-amz-json-1.1";
const SERVICE = "iam";
const HOST = "iam.amazonaws.com";
const REGION = "us-east-1";
const SIGNED_HEADERS = "content-type;host;x-amz-date";
const CANONICAL_URI = "/";
const CANONICAL_QUERY_STRING = "Action=ListUsers&Version=2010-05-08";

function getCanonicalHeaders(amzTimestamp: string) {
  return [
    "content-type:" + CONTENT_TYPE,
    "host:" + HOST,
    "x-amz-date:" + amzTimestamp + "\n",
  ].join("\n");
}

function getCanonicalRequest(canonicalHeaders: string, payloadHash: string) {
  return [
    METHOD,
    CANONICAL_URI,
    CANONICAL_QUERY_STRING,
    canonicalHeaders,
    SIGNED_HEADERS,
    payloadHash,
  ].join("\n");
}

function getAuthorizationHeader(
  scope: string,
  signature: string,
  amazonKeyId: string
) {
  return `${SIGNING_ALGORITHM} Credential=${amazonKeyId}/${scope}, SignedHeaders=${SIGNED_HEADERS}, Signature=${signature}`;
}

if (require.main === module) {
  // Get user input
  const amazonKeyId = process.argv[2];
  const secretKey = process.argv[3];

  // Get the required timestamp strings
  let [amzTimestamp, reqTimestamp] = signing.getTimestamps();
  console.log("Amazon Timestamp: " + amzTimestamp);
  console.log("Req Timestamp: " + reqTimestamp);

  // Get the scope of the request (the timestamp and the target service)
  const scope = signing.getCredentialScope(reqTimestamp, REGION, SERVICE);
  console.log("Credential Scope: " + scope);

  // API  parameters should be listed here when applicable.
  const requestParamters = ``;
  const payloadHash = signing.computeSHA256SignatureHash(requestParamters);

  const headers = getCanonicalHeaders(amzTimestamp);
  const canonicalRequest = getCanonicalRequest(headers, payloadHash);

  //  Get the AWS v4 signing key
  const key = signing.getAWS4SignatureKey(
    secretKey,
    reqTimestamp,
    REGION,
    SERVICE
  );
  const stringToSign = signing.getStringToSign(
    amzTimestamp,
    scope,
    canonicalRequest
  );

  // Sign and output user string
  const signature = signing.signHex(key, Buffer.from(stringToSign));
  console.log("Signature: " + signature);

  const authHeader = getAuthorizationHeader(scope, signature, amazonKeyId);
  console.log("Auth Header: " + authHeader);

  const canReqHeaders = {
    "Accept-Encoding": "identity",
    "Content-Type": CONTENT_TYPE,
    "X-Amz-Date": amzTimestamp,
    Authorization: authHeader,
    "Content-Length": requestParamters.length,
  };

  var options = {
    hostname: HOST,
    path: "/?Action=ListUsers&Version=2010-05-08",
    port: 443,
    method: METHOD,
    headers: canReqHeaders,
  };
  var req = https.request(options, function (res) {
    res.on("data", (d) => {
      process.stdout.write(d);
    });
  });
  req.write(requestParamters);
  req.end();
}
// can_req/ts/signing.ts

import * as crypto from "crypto";

const SIGNING_ALGORITHM = "AWS4-HMAC-SHA256";

export function getTimestamps(): [string, string] {
  const now = new Date();
  const year = now.getUTCFullYear();
  const month = String(now.getUTCMonth() + 1).padStart(2, "0");
  const day = String(now.getUTCDate()).padStart(2, "0");
  const hours = String(now.getUTCHours()).padStart(2, "0");
  const minutes = String(now.getUTCMinutes()).padStart(2, "0");
  const seconds = String(now.getUTCSeconds()).padStart(2, "0");

  const amzTimestamp = `${year}${month}${day}T${hours}${minutes}${seconds}Z`;
  const reqTimestamp = `${year}${month}${day}`;
  return [amzTimestamp, reqTimestamp];
}

export function getCredentialScope(
  reqTimestamp: string,
  region: string,
  service: string
): string {
  return `${reqTimestamp}/${region}/${service}/aws4_request`;
}

export function getStringToSign(
  amzTimestamp: string,
  scope: string,
  message: string
): string {
  return [
    SIGNING_ALGORITHM,
    amzTimestamp,
    scope,
    computeSHA256SignatureHash(message),
  ].join("\n");
}

export function sign(key: Buffer, message: Buffer): Buffer {
  return crypto.createHmac("SHA256", key).update(message).digest();
}

export function signHex(key: Buffer, message: Buffer): string {
  return crypto.createHmac("SHA256", key).update(message).digest("hex");
}

export function computeSHA256SignatureHash(input: string): string {
  return crypto.createHash("SHA256").update(input).digest("hex");
}

export function getAWS4SignatureKey(
  key: string,
  reqTimestamp: string,
  region: string,
  service: string
): Buffer {
  const kDate = sign(Buffer.from("AWS4" + key), Buffer.from(reqTimestamp));
  const kRegion = sign(kDate, Buffer.from(region));
  const kService = sign(kRegion, Buffer.from(service));
  const kSigning = sign(kService, Buffer.from("aws4_request"));
  return kSigning;
}

if (require.main === module) {
  // Get user input
  const secretKey = process.argv[2];
  const region = process.argv[3];
  const service = process.argv[4];
  const userInput = process.argv[5];

  // Get the required timestamp strings
  let [amzTimestamp, reqTimestamp] = getTimestamps();
  console.log("Amazon Timestamp: " + amzTimestamp);
  console.log("Requset Timestamp: " + reqTimestamp);

  // Get the scope of the request (the timestamp and the target service)
  const scope = getCredentialScope(reqTimestamp, region, service);
  console.log("Credential Scope: " + scope);

  //  Get the AWS v4 signing key
  const key = getAWS4SignatureKey(secretKey, reqTimestamp, region, service);
  console.log("Signing Key: " + key.toString("hex"));

  // Prepare string value to sign from user input
  const stringToSign = getStringToSign(amzTimestamp, scope, userInput);
  console.log("String to sign: " + JSON.stringify(stringToSign));

  // Sign and output user string
  const signature = signHex(key, Buffer.from(stringToSign));
  console.log("Signed String: " + signature);
}
node request.js $AWS_ACCESS_KEY_ID $AWS_SECRET_KEY
// can_req/js/request.js

const signing = require(`./signing.js`);
const https = require("https");

const METHOD = "GET";
const SIGNING_ALGORITHM = "AWS4-HMAC-SHA256";
const CONTENT_TYPE = "application/x-amz-json-1.1";
const SERVICE = "iam";
const HOST = "iam.amazonaws.com";
const REGION = "us-east-1";
const SIGNED_HEADERS = "content-type;host;x-amz-date";
const CANONICAL_URI = "/";
const CANONICAL_QUERY_STRING = "Action=ListUsers&Version=2010-05-08";

function getCanonicalHeaders(amzTimestamp) {
  return [
    "content-type:" + CONTENT_TYPE,
    "host:" + HOST,
    "x-amz-date:" + amzTimestamp + "\n",
  ].join("\n");
}

function getCanonicalRequest(canonicalHeaders, payloadHash) {
  return [
    METHOD,
    CANONICAL_URI,
    CANONICAL_QUERY_STRING,
    canonicalHeaders,
    SIGNED_HEADERS,
    payloadHash,
  ].join("\n");
}

function getAuthorizationHeader(scope, signature, amazonKeyId) {
  return `${SIGNING_ALGORITHM} Credential=${amazonKeyId}/${scope}, SignedHeaders=${SIGNED_HEADERS}, Signature=${signature}`;
}

if (require.main === module) {
  // Get user input
  const amazonKeyId = process.argv[2];
  const secretKey = process.argv[3];

  // Get the required timestamp strings
  [amzTimestamp, reqTimestamp] = signing.getTimestamps();
  console.log("Amazon Timestamp: " + amzTimestamp);
  console.log("Request Timestamp: " + reqTimestamp);

  // Get the scope of the request (the timestamp and the target service)
  const scope = signing.getCredentialScope(reqTimestamp, REGION, SERVICE);
  console.log("Credential Scope: " + scope);

  const requestParamters = ``;
  const payloadHash = signing.computeSHA256SignatureHash(requestParamters);

  const headers = getCanonicalHeaders(amzTimestamp);
  const canonicalRequest = getCanonicalRequest(headers, payloadHash);

  //  Get the AWS v4 signing key
  const key = signing.getAWS4SignatureKey(
    secretKey,
    reqTimestamp,
    REGION,
    SERVICE
  );
  console.log("Signing Key: " + key.toString("hex"));

  // Prepare string value to sign from user input
  const stringToSign = signing.getStringToSign(
    amzTimestamp,
    scope,
    canonicalRequest
  );

  // Sign and output user string
  const signature = signing.signHex(key, stringToSign);
  console.log("Signature: " + signature);

  const authHeader = getAuthorizationHeader(scope, signature, amazonKeyId);
  console.log("Auth Header: " + authHeader);

  const canReqHeaders = {
    "Accept-Encoding": "identity",
    "Content-Type": CONTENT_TYPE,
    "X-Amz-Date": amzTimestamp,
    Authorization: authHeader,
    "Content-Length": requestParamters.length,
  };

  var options = {
    hostname: HOST,
    path: "/?" + CANONICAL_QUERY_STRING,
    port: 443,
    method: METHOD,
    headers: canReqHeaders,
  };
  var req = https.request(options, function (res) {
    res.on("data", (d) => {
      process.stdout.write(d);
    });
  });
  req.write(requestParamters);
  req.end(options.body || "").on("error", (err) => {
    console.log("Error: " + err.message);
  });
}
// can_req/js/signing.js

var crypto = require("crypto");

const SIGNING_ALGORITHM = "AWS4-HMAC-SHA256";

function getTimestamps() {
  const now = new Date();
  const year = now.getUTCFullYear();
  const month = String(now.getUTCMonth() + 1).padStart(2, "0");
  const day = String(now.getUTCDate()).padStart(2, "0");
  const hours = String(now.getUTCHours()).padStart(2, "0");
  const minutes = String(now.getUTCMinutes()).padStart(2, "0");
  const seconds = String(now.getUTCSeconds()).padStart(2, "0");

  const amzTimestamp = `${year}${month}${day}T${hours}${minutes}${seconds}Z`;
  const reqTimestamp = `${year}${month}${day}`;
  return [amzTimestamp, reqTimestamp];
}

function getCredentialScope(reqTimestamp, region, service) {
  return `${reqTimestamp}/${region}/${service}/aws4_request`;
}

function getStringToSign(amzTimestamp, scope, message) {
  return [
    SIGNING_ALGORITHM,
    amzTimestamp,
    scope,
    computeSHA256SignatureHash(message),
  ].join("\n");
}

function sign(key, msg) {
  return crypto
    .createHmac("SHA256", key)
    .update(Buffer.from(msg, "utf-8"))
    .digest();
}

function signHex(key, msg) {
  return crypto.createHmac("SHA256", key).update(msg).digest("hex");
}

function computeSHA256SignatureHash(input) {
  return crypto
    .createHash("SHA256")
    .update(Buffer.from(input, "utf-8"))
    .digest("hex");
}

function getAWS4SignatureKey(key, reqTimestamp, region, service) {
  const kDate = sign(Buffer.from("AWS4" + key, "utf-8"), reqTimestamp);
  const kRegion = sign(kDate, region);
  const kService = sign(kRegion, service);
  const kSigning = sign(kService, "aws4_request");
  return kSigning;
}

if (require.main === module) {
  // Get user input
  const secretKey = process.argv[2];
  const region = process.argv[3];
  const service = process.argv[4];
  const userInput = process.argv[5];

  // Get the required timestamp strings
  [amzTimestamp, reqTimestamp] = getTimestamps();
  console.log("Amazon Timestamp: " + amzTimestamp);
  console.log("Request Timestamp: " + reqTimestamp);

  // Get the scope of the request (the timestamp and the target service)
  const scope = getCredentialScope(reqTimestamp, region, service);
  console.log("Credential Scope: " + scope);

  //  Get the AWS v4 signing key
  const key = getAWS4SignatureKey(secretKey, reqTimestamp, region, service);
  console.log("Signing Key: " + key.toString("hex"));

  // Prepare string value to sign from user input
  const stringToSign = getStringToSign(amzTimestamp, scope, userInput);
  console.log("String to sign: " + JSON.stringify(stringToSign));

  // Sign and output user string
  const signature = signHex(key, stringToSign);
  console.log("Signed String: " + signature);
}

module.exports = {
  getTimestamps,
  getCredentialScope,
  computeSHA256SignatureHash,
  getAWS4SignatureKey,
  getStringToSign,
  signHex,
};
python3 request.py $AWS_ACCESS_KEY_ID $AWS_SECRET_KEY
# can_req/py/request.py

from signing import *

import requests
import xml.dom.minidom

# Default API parameters provided here for convenience
METHOD = "GET"
SIGNING_ALGORITHM = "AWS4-HMAC-SHA256"
CONTENT_TYPE = "application/x-amz-json-1.1"
SERVICE = "iam"
HOST = "iam.amazonaws.com"
REGION = "us-east-1"
SIGNED_HEADERS = "content-type;host;x-amz-date"
CANONICAL_URI = "/"
CANONICAL_QUERY_STRING = "Action=ListUsers&Version=2010-05-08"


def get_canonical_headers(amzn_date: str) -> str:
    """Get canonical headers in proper format"""
    return "\n".join(
        [
            "content-type:{}".format(CONTENT_TYPE),
            "host:{}".format(HOST),
            "x-amz-date:{}\n".format(amzn_date),
        ]
    )


def get_canonical_requests(canonical_headers: str, payload_hash: str) -> str:
    """Generate canonical request from the provided headers and payload hash"""
    return "\n".join(
        [
            METHOD,
            CANONICAL_URI,
            CANONICAL_QUERY_STRING,
            canonical_headers,
            SIGNED_HEADERS,
            payload_hash,
        ]
    )


def get_authorization_header(scope: str, signature: str, amazon_key_id: str) -> str:
    """Get the authorization header used for verifying the authenticity of the request"""
    return "{} Credential={}/{}, SignedHeaders={}, Signature={}".format(
        SIGNING_ALGORITHM, amazon_key_id, scope, SIGNED_HEADERS, signature
    )


if __name__ == "__main__":
    # Get provided AWS access credentials
    amazon_key_id = sys.argv[1]
    amazon_secret_key = sys.argv[2]

    endpoint = "https://{}/".format(HOST)
    amazon_timestamp, req_timestamp = get_timestamps()
    print("Amazon Timestamp: " + amazon_timestamp)
    print("Request Timestamp: " + req_timestamp)

    credential_scope = get_credential_scope(req_timestamp, REGION, SERVICE)
    print("Credential Scope: " + credential_scope)

    # API parameters should be listed here when applicable.
    request_paramters = ""
    payload_hash = compute_sha256_hash(request_paramters)

    headers = get_canonical_headers(amazon_timestamp)
    canoniocal_request = get_canonical_requests(headers, str(payload_hash))

    signature_key = get_aws4_signature_key(
        amazon_secret_key, req_timestamp, REGION, SERVICE
    )
    print("Signing Key: " + base64.b64encode(signature_key).decode())
    string_to_sign = get_string_to_sign(
        amazon_timestamp, credential_scope, canoniocal_request
    )
    signature = hmac.new(
        signature_key, (string_to_sign).encode("utf-8"), hashlib.sha256
    ).hexdigest()
    print("Signature: " + signature)

    auth_header = get_authorization_header(credential_scope, signature, amazon_key_id)
    print("Auth Header: " + auth_header)

    # Perform AWS API call
    headers = {
        "Accept-Encoding": "identity",
        "Content-Type": CONTENT_TYPE,
        "X-Amz-Date": amazon_timestamp,
        "Authorization": auth_header,
    }
    resp = requests.get(
        "https://iam.amazonaws.com/?Action=ListUsers&Version=2010-05-08",
        headers=headers,
    )
    print(
        "\nAPI Response:\n"
        + xml.dom.minidom.parseString(resp.content).toprettyxml(indent="", newl="")
    )
# can_req/py/signing.py

import base64, datetime, hashlib, hmac, json, sys

SIGNING_ALGORITHM = "AWS4-HMAC-SHA256"


def get_timestamps() -> tuple[str, str]:
    """Get strings of required timestamps for canonical requests"""
    now = datetime.datetime.utcnow()
    amazon_timestamp = now.strftime("%Y%m%dT%H%M%SZ")
    req_timestamp = now.strftime("%Y%m%d")
    return amazon_timestamp, req_timestamp


def get_credential_scope(req_timestamp: str, region: str, service: str) -> str:
    """Define the scope of the request, which includes the target region and service"""
    return "{}/{}/{}/aws4_request".format(req_timestamp, region, service)


def sign(key: str, msg: str) -> bytes:
    """Generate the HMAC-SHA256 hash of a target string using the provided secret key"""
    return hmac.new(key, msg.encode("utf-8"), hashlib.sha256).digest()


def compute_sha256_hash(input: str) -> str:
    """Create SHA256 hash of a target string"""
    m = hashlib.sha256()
    m.update(input.encode("utf-8"))
    result = m.hexdigest()
    return result


def get_string_to_sign(amzn_date_stamp: str, scope: str, can_req: str) -> str:
    """Get string to sign from request parameters"""
    return "\n".join(
        [SIGNING_ALGORITHM, amzn_date_stamp, scope, compute_sha256_hash(can_req)]
    )


def get_aws4_signature_key(
    key: str, datestamp: str, region: str, service_name: str
) -> bytes:
    """Generature canonical requests signature"""
    kdate = sign(("AWS4" + key).encode("utf-8"), datestamp)
    kregion = sign(kdate, region)
    kservice = sign(kregion, service_name)
    ksigning = sign(kservice, "aws4_request")
    return ksigning


if __name__ == "__main__":
    # Get user input from command args
    amazon_secret_key = sys.argv[1]
    region = sys.argv[2]
    service = sys.argv[3]
    user_input = sys.argv[4]

    # Fetch the required timestamps
    amazon_timestamp, req_timestamp = get_timestamps()
    print("Amazon Timestamp: " + amazon_timestamp)
    print("Request Timestamp: " + req_timestamp)

    # The scope/action permitted by the signed credentials
    credential_scope = get_credential_scope(req_timestamp, region, service)
    print("Credential Scope: " + credential_scope)

    # Generate and print signed string
    signature_key = get_aws4_signature_key(
        amazon_secret_key, req_timestamp, region, service
    )
    print("Signing Key: " + base64.b64encode(signature_key).decode())
    string_to_sign = get_string_to_sign(amazon_timestamp, credential_scope, user_input)
    print("String to sign: " + json.dumps(string_to_sign))
    signature = hmac.new(
        signature_key, string_to_sign.encode("utf-8"), hashlib.sha256
    ).hexdigest()
    print("Signed String: " + signature)
go run request.go signing.go $AWS_ACCESS_KEY_ID $AWS_SECRET_KEY
// can_req/go/request.go

package main

import (
	"bytes"
	"fmt"
	"io/ioutil"
	"net/http"
	"os"
	"strings"
)

const METHOD = "GET"
const CONTENT_TYPE = "application/x-amz-json-1.1"
const SERVICE = "iam"
const HOST = "iam.amazonaws.com"
const REGION = "us-east-1"
const SIGNED_HEADERS = "content-type;host;x-amz-date"
const CANONICAL_URI = "/"
const CANONICAL_QUERY_STRING = "Action=ListUsers&Version=2010-05-08"

func getCanonicalHeaders(amazonDate string) string {
	headers := [...]string{"content-type:" + CONTENT_TYPE, "host:" + HOST, "x-amz-date:" + amazonDate + "\n"}
	return strings.Join(headers[:], "\n")
}

func getCanonicalRequest(canonicalHeaders string, payloadHash string) string {
	requestComponents := [...]string{METHOD, CANONICAL_URI, CANONICAL_QUERY_STRING, canonicalHeaders, SIGNED_HEADERS, payloadHash}
	return strings.Join(requestComponents[:], "\n")
}

func getAuthorizationHeader(scope string, signature string, amazonKeyId string) string {
	return fmt.Sprintf("%s Credential=%s/%s, SignedHeaders=%s, Signature=%s", SIGNING_ALGORITHM, amazonKeyId, scope, SIGNED_HEADERS, signature)
}

func main() {
	// Get user input from command args
	amazon_key_id := os.Args[1]
	amazon_secret_key := os.Args[2]

	// Fetch the required timestamps
	amazon_timestamp, request_timestamp := getTimestamps()
	fmt.Printf("Amazon Timestamp: %s\n", amazon_timestamp)
	fmt.Printf("Request Timestamp: %s\n", request_timestamp)

	// Get the scope of the request (the timestamp and the target service)
	scope := getCredentialScope(request_timestamp, REGION, SERVICE)
	fmt.Printf("Credential Scope: %s\n", scope)

	// API parameters should be listed here when applicable.
	requestParamters := ``
	payloadHash := computeSHA256Hash(requestParamters)

	headers := getCanonicalHeaders(amazon_timestamp)
	canonical_request := getCanonicalRequest(headers, payloadHash)

	signature_key := getAWS4SignatureKey(amazon_secret_key, request_timestamp, REGION, SERVICE)
	fmt.Printf("Signing Key: %x\n", signature_key)
	string_to_sign := getStringToSign(amazon_timestamp, scope, canonical_request)

	// Sign and output user string
	signature := signHex(signature_key, string_to_sign)
	fmt.Printf("Signature: %s\n", signature)

	auth_header := getAuthorizationHeader(scope, signature, amazon_key_id)
	fmt.Printf("Auth Header: %s\n", auth_header)

	client := &http.Client{}
	endpoint := fmt.Sprintf("https://%s/?"+CANONICAL_QUERY_STRING, HOST)
	req, err := http.NewRequest(METHOD, endpoint, bytes.NewBuffer([]byte(requestParamters)))
	if err != nil {
		fmt.Println(err)
		return
	}
	req.Header.Add("Accept-Encoding", "identity")
	req.Header.Add("Content-Type", CONTENT_TYPE)
	req.Header.Add("X-Amz-Date", amazon_timestamp)
	req.Header.Add("Authorization", auth_header)
	resp, err := client.Do(req)
	if err != nil {
		fmt.Println(err)
		return
	}
	defer resp.Body.Close()

	body, err := ioutil.ReadAll(resp.Body)
	if err != nil {
		fmt.Println(err)
		return
	}

	fmt.Println(string(body))
}
// can_req/go/signing.go

ackage main

import (
	hmac "crypto/hmac"
	"crypto/sha256"
	"encoding/json"
	"fmt"
	"os"
	"strings"
	"time"
)

const SIGNING_ALGORITHM = "AWS4-HMAC-SHA256"

func getTimestamps() (string, string) {
	now := time.Now().UTC()
	return now.Format("20060102T150405Z"), now.Format("20060102")
}

func getCredentialScope(request_timestamp string, region string, service string) string {
	return fmt.Sprintf("%s/%s/%s/aws4_request", request_timestamp, region, service)
}

func sign(key string, message string) string {
	mac := hmac.New(sha256.New, []byte(key))
	mac.Write([]byte(message))
	return string(mac.Sum(nil))
}

func signHex(key string, message string) string {
	mac := hmac.New(sha256.New, []byte(key))
	mac.Write([]byte(message))
	return fmt.Sprintf("%x", string(mac.Sum(nil)))
}

func computeSHA256Hash(input string) string {
	hash := sha256.New()
	hash.Write([]byte(input))
	return fmt.Sprintf("%x", string(hash.Sum(nil)))
}

func getStringToSign(amazon_timestamp string, scope string, can_req string) string {
	components := [...]string{SIGNING_ALGORITHM, amazon_timestamp, scope, computeSHA256Hash(can_req)}
	return strings.Join(components[:], "\n")
}

func getAWS4SignatureKey(secret_key string, request_timestamp string, region string, service string) string {
	kdate := sign("AWS4"+secret_key, request_timestamp)
	kregion := sign(kdate, region)
	kservice := sign(kregion, service)
	ksigning := sign(kservice, "aws4_request")
	return ksigning
}

func runDemo() {
	// Get user input from command args
	amazon_secret_key := os.Args[1]
	region := os.Args[2]
	service := os.Args[3]
	user_input := os.Args[4]

	// Fetch the required timestamps
	amazon_timestamp, request_timestamp := getTimestamps()
	fmt.Printf("Amazon Timestamp: %s\n", amazon_timestamp)
	fmt.Printf("Request Timestamp: %s\n", request_timestamp)

	// Get the scope/permitted API action for the signed credentials
	credential_scope := getCredentialScope(request_timestamp, region, service)
	fmt.Printf("Credential Scope: %s\n", credential_scope)

	// Generate and print signed string
	signature_key := getAWS4SignatureKey(amazon_secret_key, request_timestamp, region, service)
	fmt.Printf("Signing Key: %x\n", signature_key)
	string_to_sign := getStringToSign(amazon_timestamp, credential_scope, user_input)
	string_to_sign_formatted, _ := json.Marshal(string_to_sign)
	fmt.Printf("String to sign: `%s`\n", string_to_sign_formatted)
	signature := signHex(signature_key, string_to_sign)
	fmt.Printf("Signed String: " + signature)
}
Output
Amazon Timestamp: 20230625T182331Z
Req Timestamp: 20230625
Credential Scope: 20230625/us-west-2/ssm/aws4_request
Signature: 5a5ebdb8797f0568c19f2ea45d70bc77309ae11eff9a69990202871db3cdbcde
Auth Header: AWS4-HMAC-SHA256 Credential=BKDZY123A2Z4DV37XABC/20230625/us-west-2/ssm/aws4_request, SignedHeaders=content-type;host;x-amz-date;x-amz-target, Signature=5a5ebdb8797f0568c19f2ea45d70bc77309ae11eff9a69990202871db3cdbcde

API Response:
<?xml version="1.0" ?>
<ListUsersResponse xmlns="https://iam.amazonaws.com/doc/2010-05-08/">
  <ListUsersResult>
    <IsTruncated>false</IsTruncated>
    <Users>
      <member>
        <Path>/</Path>
        <UserName>username</UserName>
        <Arn>arn:aws:iam::563175520123456789104152:user/username</Arn>
        <UserId>BIDAFHH7AT44NDI6LEIYP</UserId>
        <CreateDate>2019-07-10T23:13:11Z</CreateDate>
      </member>
    </Users>
  </ListUsersResult>
  <ResponseMetadata>
    <RequestId>482ac647-51b2-47cd-9aa2-2eafe6bb8c8b</RequestId>
  </ResponseMetadata>
</ListUsersResponse>
While users can leverage their long-lived access keys to perform AWS API requests, it can be more desirable in certain instances to leverage short-lived access credentials, such as temporarily providing access to a third party or elevating privileges. Secure Token Service (STS) enables developers to procure and manage these temporary credentials.
While IAM users may use their access credentials to programmatically access AWS services and resources, it can be desirable to leverage short-term credentials in cases where users may want to provide temporary access or perform a privileged action in a limited timeframe. Secure Token Service, abbreviated STS, can be used both for obtaining short-lived AWS tokens and obtaining client information. Such credentials consist of the following properties:1
Command
aws sts get-session-token
Output
{
    "Credentials": {
        "AccessKeyId": "ASIAYBJ8AT44NA7VMLB1",
        "SecretAccessKey": "0aZJykOJAUQV3lalUAgoXcNoXZ2OKfxau//tAck+",
        "SessionToken": "IQoJb3JpZ2lu ... paRFtuA5mBac=",
        "Expiration": "2023-09-19T08:42:24+00:00"
    }
}
STS is a global service, meaning the API is available in all AWS regions. The default global endpoint, https://sts.amazonaws.com, is hosted in us-east-1. However, AWS recommends leveraging region-specific API endpoints when possible for the following reasons:
For example, while it is possible to request eu-central-1-scoped credentials from the global STS endpoint, services hosted in eu-central-1 should target https://sts.eu-central-1.amazonaws.com for decreased latency. The following two STS commands were executed on an AWS server instance hosted in eu-central-1 to further illustrate this:
$ export TIMEFORMAT=%R
$ time aws sts get-session-token  --region eu-central-1
...
0.834
$ time aws sts get-session-token  --region eu-central-1 --endpoint-url https://sts.eu-central-1.amazonaws.com
...
0.469
Repeated calls from the eu-central-1 server demonstrate this latency decrease consistently:

Generally, global AWS services have corresponding regional endpoints to reduce latency. Developers should ensure their applications target the appropriate regional endpoint when possible.
While cloud developers may manually fetch STS credentials to sign and perform AWS API calls, the provided CLI and SDK tools automatically manage calls to STS in the background. Developers should only consider using the STS endpoints and direct API calls to AWS should only be used when developing in languages that are not supported by AWS or when fine-grain control over AWS API calls is required. See here for a list of supported languages. (https://aws.amazon.com/developer/tools/)
The AWS CLI and SDK will typically look for credentials in the following order:
The easiest way to use STS credentials with CLI calls is simply to set the environment variables as such:
$ export AWS_ACCESS_KEY_ID=”STS_PROVIDED_ACCESS_KEY_ID”
$ export AWS_SECRET_ACCESS_KEY=”STS_PROVIDED_SECRET_ACCESS_KEY”
$ aws sts get-caller-identity
In addition to fetching short term credentials, STS can be used to acquire information pertaining to the active caller or given access key.
To fetch information pertaining to the credentials actively used in signing requests, STS provides GetCallerIdentityInfo endpoint. This endpoint returns the following information:1
Command
aws sts get-caller-identity
Output
{
    "UserId": "AIDAYJG7SY44NDI7LOIES",
    "Account": "012345678910",
    "Arn": "arn:aws:iam::012345678910:user/username"
}
For a given access key ID, it is possible to get the parent account ID of the credentials using the GetAccessKeyInfo endpoint.2
Command
aws sts get-access-key-info --access-key-id $AWS_ACCESS_KEY_ID
Output
{
    "Account": "012345678910"
}
Identity and Access Management (IAM) service enables cloud administrators to define, manage, and audit an AWS user’s level of access to AWS APIs and resources within an account.
IAM, which stands for Identity Access Management, is an AWS service used to manage API and web console access to cloud resources.
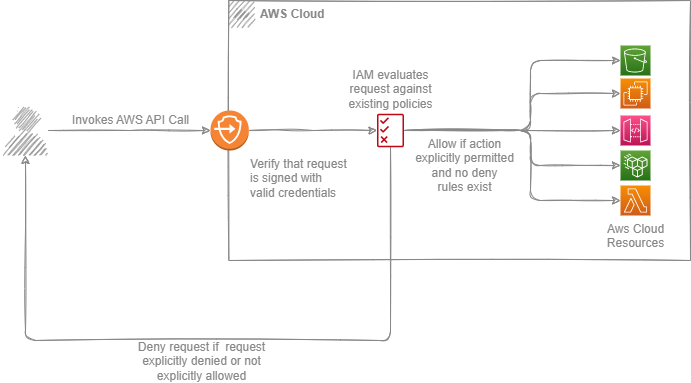
When a user attempts to access an AWS resource through the API or web console, an HTTP request is sent to the endpoint for the target AWS service. After verifying the request signature, it is evaluated against all relevant IAM access policies, which dictate the allowed actions for the caller. If there exists at least one rule granting access and no explicit deny rule in any policies or permission boundaries, then the request is granted. Otherwise, it is rejected.
IAM primarily handles all aspects of authentication and authorization when accessing cloud services.1 Authentication determines the validity of the identity of a user while authorization determines whether a given identity is permitted to perform a given action.
Identity is an entity that enables access to an AWS account’s cloud resources.1 IAM provides the following entities for managing identity information:
Once the identity of the caller has been established, the next step is to determine whether they are authorized to perform the requested action. To accomplish this, IAM evaluates the identity against all relevant policies, which specifies the allowed and restricted actions for a given user. These IAM policies can be directly assigned to users or groups or through Attribute Access Control (ABAC), which associates a policy with an identity based on the identity’s tags.2
In addition to providing services to define identity information and access, IAM also provides services to ensure best practices are enforced regarding access. Some of this tooling includes analyzing user’s access patterns to refine permissions, identifying unused permissions, and other auditing capabilities.
IAM handles authentication and authorization when accessing resources via the AWS APIs. It is not intended for the following use-cases:
An IAM identity refers to some entity that provides access to AWS resources. There are several types of identities provided by IAM for this purpose, including users, user groups, and roles. By default, newly created identities have no permissions. These entities must be explicitly assigned permissions to successfully perform API calls, which will be discussed in the following Access section.
IAM users represent a human user or programmatic workload and provides access to AWS resources or services. Users belong to a single parent account and consists of the following properties and credentials:
Command
aws iam get-user --user-name $USERNAME
Output
{
    "User": {
        "Path": "/",
        "UserName": "username",
        "UserId": "ADSAYFF72444NEI6MNIOP",
        "Arn": "arn:aws:iam::012345678910:user/username",
        "CreateDate": "2019-07-10T23:13:11+00:00",
        "Tags": [
            {
                "Key": "TagName",
                "Value": "TagValue"
            }
        ]
    }
}
Upon creating a new AWS account, a root user is automatically created, which has complete access to all cloud resources with limited exceptions. For this reason, it is recommended that you create an administrator user for everyday use and restrict access to root user credentials.
There are two possible login flows depending on the type of user attempting to sign in.1
To sign in as a root user, simply navigate to the sign-in page, select “Root User”, and enter the root user credentials and optional MFA code.
To sign in to the AWS console as a non-root user, you can either use standard sign-in webpage and provide the target AWS account number or specify the account alias in the URL as such: https://<account_id_or_alias>.signin.aws.amazon.com/console/.
To provision an IAM user, the only required property is the username, which is unique within the AWS account.
pulumi up -y
pulumi destroy -y
// iam/identities/users/create_user/ts/index.ts

import * as aws from "@pulumi/aws";

// Create IAM user with long-lived access credentials
const user = new aws.iam.User("techsquawks-user", {
    name: "techsquawks-user"
});

// Export user information
export const userArn = user.arn;
export const userName = user.name;
pulumi up -y
pulumi destroy -y
// iam/identities/users/create_user/js/index.js

"use strict";
const aws = require("@pulumi/aws");

// Create IAM user with long-lived access credentials
const user = new aws.iam.User("techsquawks-user", {
    name: "techsquawks-user"
});

// Export user information
exports.userArn = user.arn;
exports.userName = user.name;
pulumi up -y
pulumi destroy -y
# iam/identities/users/create_user/py/__main__.py

import pulumi
from pulumi_aws import iam

# Create IAM user with long-lived access credentials
user = iam.User("techsquawks-user", name="techsquawks-user")

# Export user information
pulumi.export('userArn', user.arn)
pulumi.export('userName', user.name)
pulumi up -y
pulumi destroy -y
// iam/identities/users/create_user/go/main.go

package main

import (
	"github.com/pulumi/pulumi-aws/sdk/v5/go/aws/iam"
	"github.com/pulumi/pulumi/sdk/v3/go/pulumi"
)

func main() {
	pulumi.Run(func(ctx *pulumi.Context) error {
		// Create IAM user with long-lived access credentials
		user, err := iam.NewUser(ctx, "techsquawks-user", &iam.UserArgs{
			Name: pulumi.String("techsquawks-user"),
		})
		if err != nil {
			return err
		}

		// Export user information
		ctx.Export("userArn", user.Arn)
		ctx.Export("userName", user.Name)
		return nil
	})
}
Stack Outputs
Outputs:
    userArn : "arn:aws:iam::012345678910:user/techsquawks-user"
    userName: "techsquawks-user"
To further verify that the user was provisioned correctly, the identity can be fetched via the get-user IAM API call.
Command
aws iam get-user --user-name techsquawks-user
Output
{
    "User": {
        "Path": "/",
        "UserName": "techsquawks-user",
        "UserId": "DBSAYFF32444NEI6MNIOP",
        "Arn": "arn:aws:iam::012345678910:user/techsquawks-user",
        "CreateDate": "2023-07-10T23:13:11+00:00",
    }
}
Paths are analogous to namespaces and help in organizing IAM users both for reporting and associating permissions.
pulumi up -y
pulumi destroy -y
// iam/identities/users/paths/ts/index.ts

import * as aws from "@pulumi/aws";

// Create IAM user with long-lived access credentials
const user1 = new aws.iam.User("techsquawks-user-1", {
    name: "techsquawks-user",
    path: "/example/path/1/"
});
const user2 = new aws.iam.User("techsquawks-user-2", {
    name: "techsquawks-user-2",
    path: "/example/path/2/"
});
const user2a = new aws.iam.User("techsquawks-user-2a", {
    name: "techsquawks-user-2a",
    path: "/example/path/2/"
});
pulumi up -y
pulumi destroy -y
// iam/identities/users/paths/js/index.js

"use strict";
const aws = require("@pulumi/aws");

// Create IAM user with long-lived access credentials
const user1 = new aws.iam.User("techsquawks-user-1", {
    name: "techsquawks-user1",
    path: "/example/path/1/"
});
const user2 = new aws.iam.User("techsquawks-user-2", {
    name: "techsquawks-user-2",
    path: "/example/path/2/"
});
const user2a = new aws.iam.User("techsquawks-user-2a", {
    name: "techsquawks-user-2a",
    path: "/example/path/2/"
});
pulumi up -y
pulumi destroy -y
# iam/identities/users/paths/py/__main__.py

import pulumi
from pulumi_aws import iam

# Create IAM user with long-lived access credentials
user1 = iam.User("techsquawks-user-1", name="techsquawks-user1", path="/example/path/1/")
user2 = iam.User("techsquawks-user-2a", name="techsquawks-user2", path="/example/path/2/")
user2a = iam.User("techsquawks-user-2b", name="techsquawks-user2a", path="/example/path/2/")
pulumi up -y
pulumi destroy -y
// iam/identities/users/paths/go/main.go

package main

import (
	"github.com/pulumi/pulumi-aws/sdk/v5/go/aws/iam"
	"github.com/pulumi/pulumi/sdk/v3/go/pulumi"
)

func main() {
	pulumi.Run(func(ctx *pulumi.Context) error {
		// Create IAM user with long-lived access credentials
		_, err := iam.NewUser(ctx, "techsquawks-user1", &iam.UserArgs{
			Name: pulumi.String("techsquawks-user1"),
			Path: pulumi.String("/example/path/1/"),
		})
		if err != nil {
			return err
		}
		_, err = iam.NewUser(ctx, "techsquawks-user2", &iam.UserArgs{
			Name: pulumi.String("techsquawks-user2"),
			Path: pulumi.String("/example/path/2/"),
		})
		if err != nil {
			return err
		}
		_, err = iam.NewUser(ctx, "techsquawks-user2a", &iam.UserArgs{
			Name: pulumi.String("techsquawks-user2a"),
			Path: pulumi.String("/example/path/2/"),
		})
		if err != nil {
			return err
		}
		return nil
	})
}
Users who belong to the same path can be targeted in certain IAM operations, such as listing users:
Command
aws iam list-users --path "/example/path/2/"
Output
{
    "Users": [
        {
            "Path": "/example/path/2/",
            "UserName": "techsquawks-user-2",
            "UserId": "AFCAYGH7AQ44FXTSPCX55",
            "Arn": "arn:aws:iam::012345678910:user/example/path/2/techsquawks-user-2",
            "CreateDate": "2023-07-24T22:39:32+00:00"
        },
		{
            "Path": "/example/path/2/",
            "UserName": "techsquawks-user-2a",
            "UserId": "BEAAYHI7AQ45GXTQPCX44",
            "Arn": "arn:aws:iam::012345678910:user/example/path/2/techsquawks-user-2a",
            "CreateDate": "2023-07-24T22:39:32+00:00"
        }
    ]
}
To access cloud resources through the API, users may be associated with a set of long-lived access credential key pair, consisting of an access key ID and secret key for signing requests.
pulumi up -y
pulumi destroy -y
// iam/identities/users/access_credentials/ts/index.ts

import * as aws from "@pulumi/aws";

// Create IAM user with long-lived access credentials
const user = new aws.iam.User("techsquawks-user", {
    name: "techsquawks-user"
});
const credentials = new aws.iam.AccessKey("techsquawks-user-credentials", {user: user.name});

// Export user information
export const userArn = user.arn;
export const userName = user.name;
export const userAccessKeyId = credentials.id;
export const userAccessSecret = credentials.secret;
pulumi up -y
pulumi destroy -y
// iam/identities/users/access_credentials/js/index.js

"use strict";
const aws = require("@pulumi/aws");

// Create IAM user with long-lived access credentials
const user = new aws.iam.User("techsquawks-user", {
    name: "techsquawks-user"
});
const credentials = new aws.iam.AccessKey("techsquawks-user-credentials", {user: user.name});

// Export user information
exports.userArn = user.arn;
exports.userName = user.name;
exports.userAccessKeyId = credentials.id;
exports.userAccessSecret = credentials.secret;
pulumi up -y
pulumi destroy -y
# iam/identities/users/access_credentials/py/__main__.py

import pulumi
from pulumi_aws import iam

# Create IAM user with long-lived access credentials
user = iam.User("techsquawks-user", name="techsquawks-user")
credentials = iam.AccessKey("techsquawks-user-credentials", user=user.name)

# Export user information
pulumi.export('userArn', user.arn)
pulumi.export('userName', user.name)
pulumi.export('userAccessKeyId', credentials.id)
pulumi.export('userSecretKey', credentials.secret)
pulumi up -y
pulumi destroy -y
// iam/identities/users/access_credentials/go/main.go

package main

import (
	"github.com/pulumi/pulumi-aws/sdk/v5/go/aws/iam"
	"github.com/pulumi/pulumi/sdk/v3/go/pulumi"
)

func main() {
	pulumi.Run(func(ctx *pulumi.Context) error {
		// Create IAM user with long-lived access credentials
		user, err := iam.NewUser(ctx, "techsquawks-user", &iam.UserArgs{
			Name: pulumi.String("techsquawks-user"),
		})
		if err != nil {
			return err
		}
		credentials, err := iam.NewAccessKey(ctx, "techsquawks-user-credentials", &iam.AccessKeyArgs{
			User: user.Name,
		})
		if err != nil {
			return err
		}

		// Export user information
		ctx.Export("userArn", user.Arn)
		ctx.Export("userName", user.Name)
		ctx.Export("userAccessKeyId", credentials.ID())
		ctx.Export("userSecretKey", credentials.Secret)
		return nil
	})
}
Stack Outputs
Outputs:
    userAccessKeyId: "BKINYAJ78Q44D3CT4NER"
    userArn :        "arn:aws:iam::012345678910:user/techsquawks-user"
    userName:        "techsquawks-user"
    userSecretKey:   [secret]
Sensitive values are hidden by default in the Pulumi stack output. To get the secret key value, execute pulumi stack output userSecretKey --show-secrets --stack dev
To validate that the access credentials work as expected, invoke the caller identity API using the newly provisioned credentials:
Command
AWS_ACCESS_KEY_ID=$(pulumi stack output userAccessKeyId --stack dev)
AWS_SECRET_ACCESS_KEY=$(pulumi stack output userSecretKey --stack dev --show-secrets)
aws sts get-caller-identity
Output
{
    "UserId": "BKXNYAA78Q56W3CT4NTJ",
    "Account": "012345678910,
    "Arn": "arn:aws:iam::012345678910:user/techsquawks-user"
}
While API access requires user access keys, password credentials are required for accessing the AWS account resources via the web console. IAM provides various API methods and resources for managing user passwords. For instance, login profiles define the password constraints for a given user.
pulumi up -y
pulumi destroy -y
// iam/identities/users/user_login_profile/ts/index.ts

import * as aws from "@pulumi/aws";

// Create IAM user with password/console credentials
const user = new aws.iam.User("techsquawks-user", {
    name: "techsquawks-user",
    forceDestroy: true
});
const loginProfile = new aws.iam.UserLoginProfile("techsquawks-user-login-profile", {
    user: user.name,
    passwordLength: 15,
    passwordResetRequired: true
});
export const password = loginProfile.password;
pulumi up -y
pulumi destroy -y
// iam/identities/users/user_login_profile/js/index.js

"use strict";
const aws = require("@pulumi/aws");

// Create IAM user with password/console credentials
const user = new aws.iam.User("techsquawks-user", {
    name: "techsquawks-user",
    forceDestroy: true
});
const loginProfile = new aws.iam.UserLoginProfile("techsquawks-user-login-profile", {
    user: user.name,
    passwordLength: 15,
    passwordResetRequired: true
});
exports.password = loginProfile.password;
pulumi up -y
pulumi destroy -y
# iam/identities/users/user_login_profile/py/__main__.py

import pulumi
from pulumi_aws import iam

# Create IAM user with long-lived access credentials
user = iam.User("techsquawks-user", name="techsquawks-user")
login_profile = iam.UserLoginProfile("techsquawks-user-login-profile",
    user=user.name,
    password_length=15,
    password_reset_required=True
);

pulumi.export('password', login_profile.password)
pulumi up -y
pulumi destroy -y
// iam/identities/users/user_login_profile/go/main.go

package main

import (
	"github.com/pulumi/pulumi-aws/sdk/v5/go/aws/iam"
	"github.com/pulumi/pulumi/sdk/v3/go/pulumi"
)

func main() {
	pulumi.Run(func(ctx *pulumi.Context) error {
		// Create IAM user with password/console credentials
		user, err := iam.NewUser(ctx, "techsquawks-user", &iam.UserArgs{
			Name: pulumi.String("techsquawks-user"),
		})
		if err != nil {
			return err
		}
		loginProfile, err := iam.NewUserLoginProfile(ctx, "loginProfile", &iam.UserLoginProfileArgs{
			User:                  user.Name,
			PasswordLength:        pulumi.Int(15),
			PasswordResetRequired: pulumi.Bool(true),
		})
		if err != nil {
			return err
		}
		ctx.Export("password", loginProfile.Password)
		return nil
	})
}
IAM groups act as containers for multiple IAM users. Groups can have IAM policies associated with them, which are automatically inherited by child users when evaluating access. This allows administrators to more easily manage access for multiple users simultaneously. User may belong to several groups, but groups cannot contain other groups.
There is no default group for newly created users. Therefore, any groups must be explicitly created and poclicies must be explicitly assigned to the groups.1
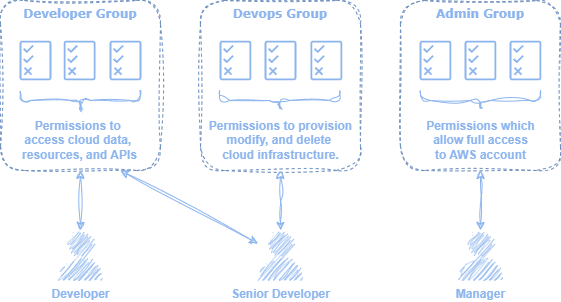
Figure 1: Permissions may be assigned to groups which are automatically applied to assigned users.
Groups are rather simply entities, with the main component required being the group name. Similar to users, groups also may have a path specified which can be used to further distinguish groups while querying.
Command
aws iam list-groups
Output
{
    "Groups": [
        {
            "Path": "/",
            "GroupName": "Admins",
            "GroupId": "AGPAYGH7AQ44DKI7UGME4",
            "Arn": "arn:aws:iam::012345678910:group/Administrators",
            "CreateDate": "2019-10-01T22:50:30+00:00"
        },
        {
            "Path": "/",
            "GroupName": "Developers",
            "GroupId": "AGPAYGH7AQ44BVG3THNH7",
            "Arn": "arn:aws:iam::012345678910:group/Developers",
            "CreateDate": "2019-07-10T23:10:47+00:00"
        },
        {
            "Path": "/",
            "GroupName": "Devops",
            "GroupId": "ADSAYFF72444NEI6MNIOP",
            "Arn": "arn:aws:iam::012345678910:group/Devops",
            "CreateDate": "2019-07-10T23:10:47+00:00"
        }
    ]
}
Similar to users, roles are IAM identities intended to grant access to AWS resources. However, unlike users, roles lack any long-lived credentials such as console passwords and access key pairs. Rather, they are assumed by other authorized identities temporarily to obtain a certain level of access. 1 Once assumed, the user is given temporary short-lived credentials via the AWS STS service, which are associated with the role permissions.
In addition to authorizing other human users to perform certain actions, roles may also be associated with AWS services to perform certain API calls. These are known as service-linked roles. 2